Run a vAccel application in a VM
Overview
To run our code in a VM, we will have to use a virtual plugin that will handle the forwarding of the function call from the VM to the Host system. That said, we still need vAccel in the Host system to execute the forwarded call. A visual representation of the execution flow is shown in Figure 1.
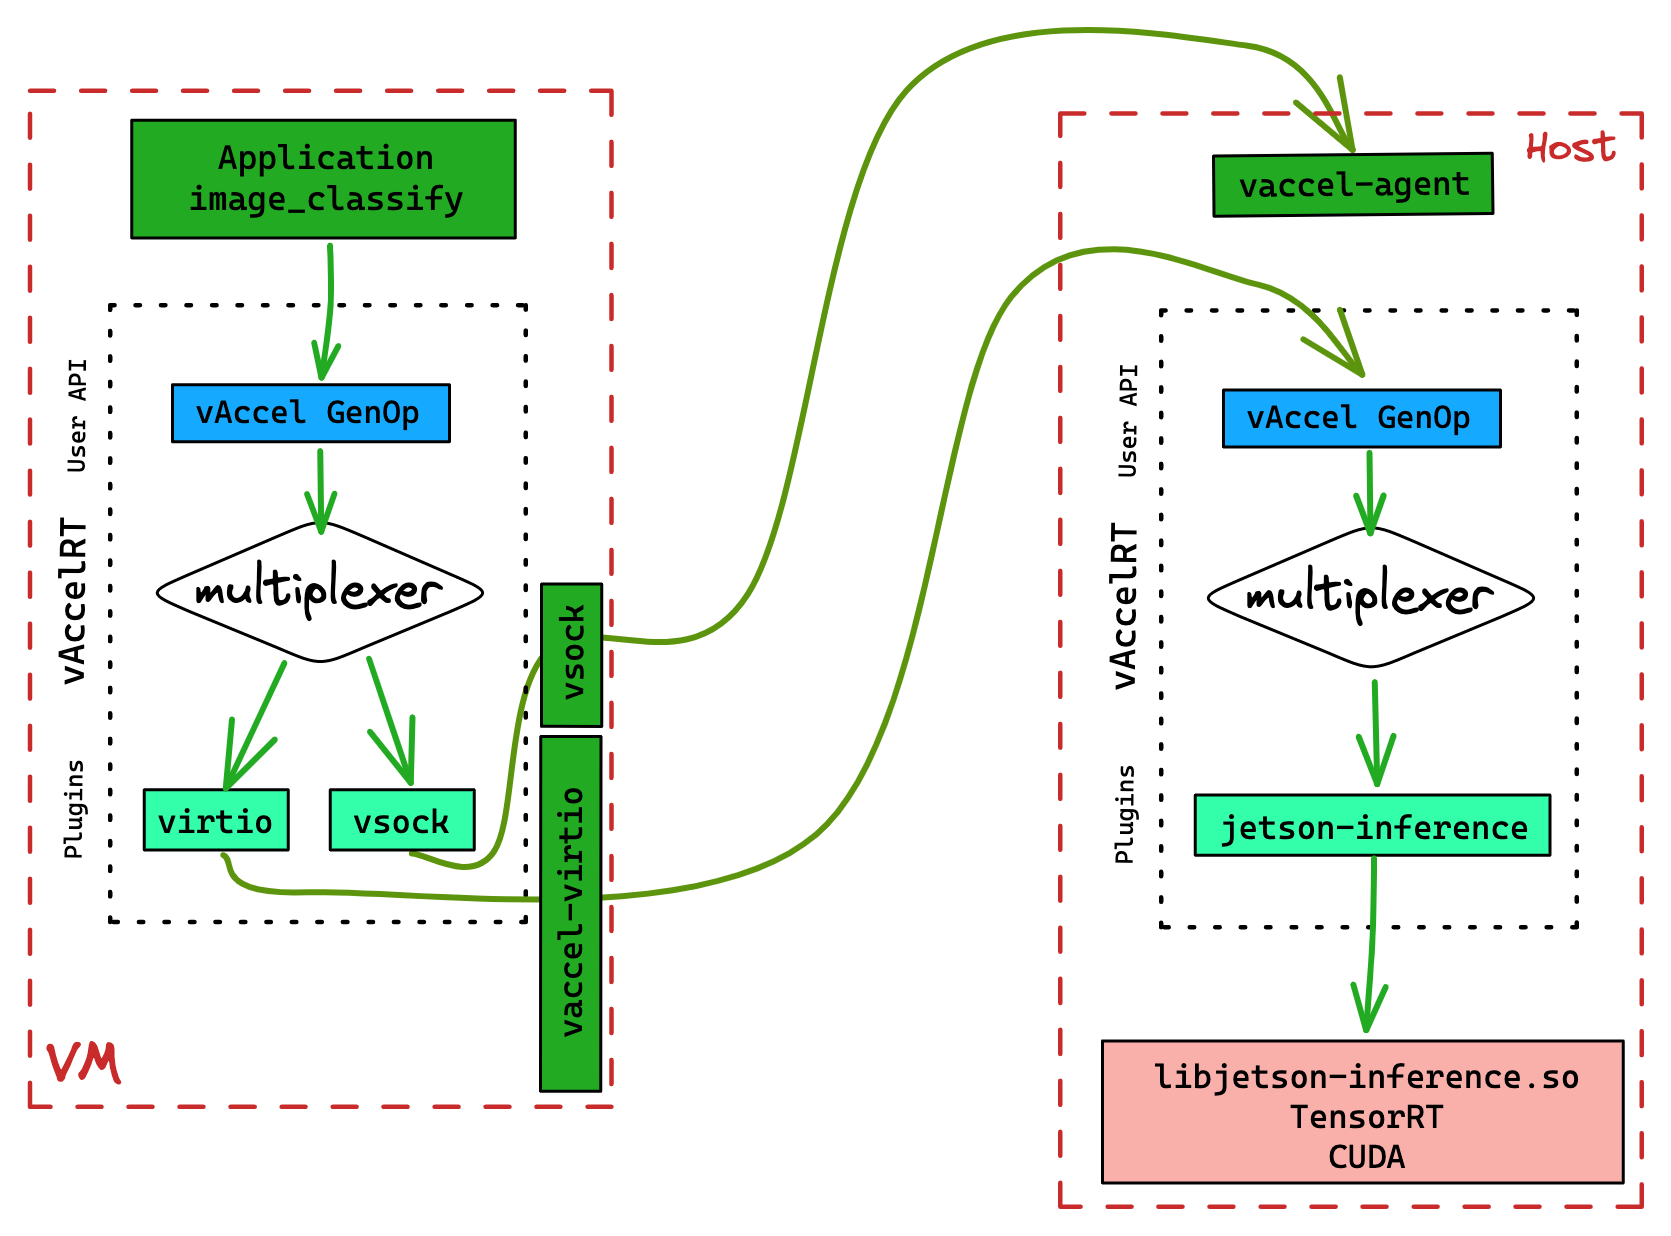
To enable this functionality, we will use the VSOCK plugin in the guest, and,
as previously, the NOOP plugin in the Host. To intercept requests originating
from the guest, we use the vAccelRT agent, running on the Host. Section
Running the agent describes the process to run the agent.
First, let's bootstrap the VM.
Boostrap the VM
To bootstrap a simple VM we have the option of using any hypervisor/VMM that
supports the virtio-vsock device. We have tried: AWS
Firecracker, QEMU, Cloud
Hypervisor, and Dragonball.
First, we will need an example kernel & rootfs. All rust-vmm based VMMs can
use the same artifacts. For QEMU we will use a different kernel, but the same
rootfs.
Each section below describes the steps for the respective VMM.
The common file for all cases is the rootfs image. You can get it using the following command:
wget https://s3.nbfc.io/nbfc-assets/github/vaccelrt/vm-example/x86_64/rootfs.img
Firecracker
You can get the binaries needed for booting a Firecracker VM using the commands below:
wget https://s3.nbfc.io/nbfc-assets/github/vaccelrt/vm-example/x86_64/fc/firecracker
wget https://s3.nbfc.io/nbfc-assets/github/vaccelrt/vm-example/x86_64/fc/config_vsock.json
wget https://s3.nbfc.io/nbfc-assets/github/vaccelrt/vm-example/x86_64/rust-vmm/vmlinux
We should have the following files available:
# tree .
.
├── config_vsock.json
├── firecracker
├── rootfs.img
└── vmlinux

0 directories, 4 files
To launch the VM, all we have to do is run the following command (make sure you run as root):
chmod +x firecracker

./firecracker --api-sock fc.sock --config-file config_vsock.json
Note You have to make sure that ./fc.sock and /tmp/vaccel.sock are cleaned up
before launching the VM, as firecracker will fail with the following errors:
[anonymous-instance:fc_api:ERROR:src/firecracker/src/api_server_adapter.rs:163] Failed to open the API socket at: fc.sock. Check that it is not already used.
or
[anonymous-instance:main:ERROR:src/firecracker/src/main.rs:496] Configuration for VMM from one single json failed: Vsock device error: Cannot create backend for vsock device: UnixBind(Os { code: 98, kind: AddrInUse, message: "Address in use" })
So make sure before launching to rm these files: rm fc.sock ; rm /tmp/vaccel.sock
We should be presented with a login prompt:
# ./firecracker --api-sock fc.sock --config-file config_vsock.json
[    0.000000] Linux version 5.10.0 (runner@gh-cloud-pod-t4rjg) (gcc (Ubuntu 8.4.0-3ubuntu2) 8.4.0, GNU ld (GNU Binutils for Ubuntu) 2.34) #1 SMP Tue Mar 22 20:07:37 UTC 2022
[    0.000000] Command line: console=ttyS0 reboot=k panic=1 pci=off loglevel=8 root=/dev/vda ip=172.42.0.2::172.42.0.1:255.255.255.0::eth0:off random.trust_cpu=on root=/dev/vda rw virtio_mmio.device=4K@0xd0000000:5 virtio_mmio.device=4K@0xd0001000:6 virtio_mmio.device=4K@0xd0002000:7
[...]
[    1.113425] EXT4-fs (vda): mounted filesystem with ordered data mode. Opts: (null)
[    1.114644] VFS: Mounted root (ext4 filesystem) on device 254:0.
[    1.115459] devtmpfs: mounted
[    1.116096] Freeing unused decrypted memory: 2036K
[    1.116945] Freeing unused kernel image (initmem) memory: 1420K
[    1.128668] Write protecting the kernel read-only data: 14336k
[    1.131705] Freeing unused kernel image (text/rodata gap) memory: 2044K
[    1.133465] Freeing unused kernel image (rodata/data gap) memory: 144K
[    1.134869] Run /sbin/init as init process
[    1.135755]   with arguments:
[    1.136400]     /sbin/init
[    1.137017]   with environment:
[    1.137712]     HOME=/
[    1.138225]     TERM=linux
[    1.159918] systemd[1]: Failed to find module 'autofs4'
[    1.163986] systemd[1]: systemd 245.4-4ubuntu3.11 running in system mode. (+PAM +AUDIT +SELINUX +IMA +APPARMOR +SMACK +SYSVINIT +UTMP +LIBCRYPTSETUP +GCRYPT +GNUTLS +ACL +XZ +LZ4 +SECCOMP +BLKID +ELFUTILS +KMOD +IDN2 -IDN +PCRE2 default-hierarchy=hybrid)
[    1.166524] systemd[1]: Detected virtualization kvm.
[    1.167101] systemd[1]: Detected architecture x86-64.

Welcome to Ubuntu 20.04.2 LTS!

[...]
[  OK  ] Finished Permit User Sessions.
[  OK  ] Started Getty on tty1.
[  OK  ] Started Serial Getty on ttyS0.
[  OK  ] Reached target Login Prompts.
[  OK  ] Started Network Name Resolution.
[  OK  ] Finished Remove Stale Onli…ext4 Metadata Check Snapshots.
[  OK  ] Reached target Host and Network Name Lookups.
[  OK  ] Started OpenBSD Secure Shell server.
[  OK  ] Started Login Service.
[  OK  ] Started Dispatcher daemon for systemd-networkd.
[  OK  ] Reached target Multi-User System.
[  OK  ] Reached target Graphical Interface.
         Starting Update UTMP about System Runlevel Changes...
[  OK  ] Finished Update UTMP about System Runlevel Changes.

Ubuntu 20.04.2 LTS vaccel-guest.nubificus.co.uk ttyS0

vaccel-guest login:
Go ahead and log in (user: root, no password).
launch a new terminal and go to Running the application
Cloud hypervisor
For Cloud Hypervisor, the process is almost identical to Firecracker
(rust-vmm-based). You can get the binaries needed for booting a Cloud Hypervisor
VM using the commands below:
wget https://s3.nbfc.io/nbfc-assets/github/vaccelrt/vm-example/x86_64/clh/cloud-hypervisor
wget https://s3.nbfc.io/nbfc-assets/github/vaccelrt/vm-example/x86_64/rust-vmm/vmlinux
We should have the following files available:
# tree .
.
├── cloud-hypervisor
├── rootfs.img
└── vmlinux

0 directories, 3 files
We need to make the VMM binary file executable:
chmod +x cloud-hypervisor
To launch the VM, all we have to do is run the following command:
./cloud-hypervisor --kernel vmlinux --disk path=rootfs.img \
           --memory size=1024M --cpus boot=1 \
           --cmdline "console=hvc0 root=/dev/vda rw" \
           --vsock cid=42,socket=/tmp/vaccel.sock \
           --console tty
We should be presented with a login prompt:
[    0.000000] Linux version 6.0.0 (ananos@dell00) (gcc (Ubuntu 9.4.0-1ubuntu1~20.04.1) 9.4.0, GNU ld (GNU Binutils for Ubuntu) 2.34) #14 SMP PREEMPT_DYNAMIC Mon Nov 14 15:52:14 UTC 2022
[    0.000000] Command line: console=hvc0 root=/dev/vda rw
[...]
[    0.448586] systemd[1]: systemd 245.4-4ubuntu3.11 running in system mode. (+PAM +AUDIT +SELINUX +IMA +APPARMOR +SMACK +SYSVINIT +UTMP +LIBCRYPTSETUP +GCRYPT +GNUTLS +ACL +XZ +LZ4 +SECCOMP +BLKID +ELFUTILS +KMOD +IDN2 -IDN +PCRE2 default-hierarchy=hybrid)
[    0.448851] systemd[1]: Detected virtualization kvm.
[    0.448901] systemd[1]: Detected architecture x86-64.

Welcome to Ubuntu 20.04.2 LTS!

[    0.450357] systemd[1]: Set hostname to <vaccel-guest.nubificus.co.uk>.
[    0.478414] systemd-fstab-g (79) used greatest stack depth: 14152 bytes left
[    0.508385] systemd-sysv-ge (86) used greatest stack depth: 13976 bytes left
[    0.540187] systemd[1]: system-getty.slice: unit configures an IP firewall, but the local system does not support BPF/cgroup firewalling.
[...]
[  OK  ] Started OpenBSD Secure Shell server.
[  OK  ] Started Login Service.
[  OK  ] Started Dispatcher daemon for systemd-networkd.
[  OK  ] Reached target Multi-User System.
[  OK  ] Finished Remove Stale Onli…ext4 Metadata Check Snapshots.
[  OK  ] Reached target Graphical Interface.
         Starting Update UTMP about System Runlevel Changes...
[  OK  ] Finished Update UTMP about System Runlevel Changes.

Ubuntu 20.04.2 LTS vaccel-guest.nubificus.co.uk hvc0

vaccel-guest login:
Go ahead and log in (user: root, no password).
launch a new terminal and go to Running the application
QEMU
You need the following files to bootstrap a QEMU VM:
# Get the hypervisor
wget https://s3.nbfc.io/nbfc-assets/github/vaccelrt/vm-example/qemu/qemu-system-x86_64

# Get the firmware
wget https://s3.nbfc.io/nbfc-assets/github/vaccelrt/vm-example/qemu/bios-256k.bin
wget https://s3.nbfc.io/nbfc-assets/github/vaccelrt/vm-example/qemu/bios-microvm.bin
wget https://s3.nbfc.io/nbfc-assets/github/vaccelrt/vm-example/qemu/linuxboot_dma.bin

# Get the kernel
wget https://s3.nbfc.io/nbfc-assets/github/vaccelrt/vm-example/qemu/bzImage
The directory structure should be like the following:
# tree
.
├── bios-256k.bin
├── bios-microvm.bin
├── bzImage
├── linuxboot_dma.bin
└── qemu-system-x86_64

0 directories, 5 files
To spawn a QEMU VM, we have two options: PCI and nonPCI.
Generic QEMU, PCI devices:
qemu-system-x86_64 -nographic -nodefaults -cpu host -enable-kvm \
    -kernel bzImage \
    -append "console=ttyS0 earlyprintk=ttyS0 root=/dev/vda rw " \
    -serial stdio \
    -drive if=none,id=rootfs,file=rootfs.img,format=raw,cache=none \
    -device virtio-blk,drive=rootfs \
    -device vhost-vsock-pci,id=vhost-vsock-pci0,guest-cid=42
The result of the above command is, again, a login prompt:
No EFI environment detected.
early console in extract_kernel
input_data: 0x00000000029e740d
input_len: 0x0000000000a4793b
output: 0x0000000001000000
output_len: 0x00000000023e9c74
kernel_total_size: 0x0000000002030000
needed_size: 0x0000000002400000
trampoline_32bit: 0x000000000009d000
Physical KASLR using RDRAND RDTSC...
Virtual KASLR using RDRAND RDTSC...

Decompressing Linux... Parsing ELF... Performing relocations... done.
Booting the kernel.
[    0.000000] Linux version 6.0.0 (ananos@dell00) (gcc (Ubuntu 9.4.0-1ubuntu1~20.04.1) 9.4.0, GNU ld (GNU Binutils for Ubuntu) 2.34) #14 SMP PREEMPT_DYNAMIC Mon Nov 14 15:52:14 UTC 2022
[    0.000000] Command line: console=ttyS0 earlyprintk=ttyS0 root=/dev/vda rw
[...]
[    1.309501] systemd[1]: systemd 245.4-4ubuntu3.11 running in system mode. (+PAM +AUDIT +SELIN)
[    1.312571] systemd[1]: Detected virtualization kvm.
[    1.313443] systemd[1]: Detected architecture x86-64.

Welcome to Ubuntu 20.04.2 LTS!

[    1.332457] systemd[1]: Set hostname to <vaccel-guest.nubificus.co.uk>.
[    1.376221] systemd-debug-g (75) used greatest stack depth: 14088 bytes left
[    1.395972] systemd-sysv-ge (83) used greatest stack depth: 13976 bytes left
[...]
[  OK  ] Started Login Service.
[  OK  ] Started OpenBSD Secure Shell server.
[  OK  ] Finished Remove Stale Onli…ext4 Metadata Check Snapshots.
[  OK  ] Started Dispatcher daemon for systemd-networkd.
[  OK  ] Reached target Multi-User System.
[  OK  ] Reached target Graphical Interface.
         Starting Update UTMP about System Runlevel Changes...
[  OK  ] Finished Update UTMP about System Runlevel Changes.

Ubuntu 20.04.2 LTS vaccel-guest.nubificus.co.uk ttyS0

vaccel-guest login:
QEMU microVM, noPCI:
qemu-system-x86_64 -nographic -M microvm -nodefaults -cpu host -enable-kvm \
    -kernel bzImage \
    -append "console=ttyS0 earlyprintk=ttyS0 root=/dev/vda rw " \
        -serial stdio \
        -drive if=none,id=rootfs,file=rootfs.img,format=raw,cache=none \
        -device virtio-blk-device,drive=rootfs \
        -device vhost-vsock-device,id=vhost-vsock,guest-cid=42
No EFI environment detected.
early console in extract_kernel
input_data: 0x00000000029e740d
input_len: 0x0000000000a4793b
output: 0x0000000001000000
output_len: 0x00000000023e9c74
kernel_total_size: 0x0000000002030000
needed_size: 0x0000000002400000
trampoline_32bit: 0x000000000009d000
Physical KASLR using RDRAND RDTSC...
Virtual KASLR using RDRAND RDTSC...

Decompressing Linux... Parsing ELF... Performing relocations... done.
Booting the kernel.
[    0.000000] Linux version 6.0.0 (ananos@dell00) (gcc (Ubuntu 9.4.0-1ubuntu1~20.04.1) 9.4.0, GNU ld (GNU Binutils for Ubuntu) 2.34) #14 SMP PREEMPT_DYNAMIC Mon Nov 14 15:52:14 UTC 2022
[    0.000000] Command line: console=ttyS0 earlyprintk=ttyS0 root=/dev/vda rw  virtio_mmio.device=512@0xc0000e00:12 virtio_mmio.device=512@0xc0000c00:11
[...]
[    1.340120] systemd[1]: systemd 245.4-4ubuntu3.11 running in system mode. (+PAM +AUDIT +SELIN)
[    1.342102] systemd[1]: Detected virtualization kvm.
[    1.342505] systemd[1]: Detected architecture x86-64.

Welcome to Ubuntu 20.04.2 LTS!

[    1.374255] systemd[1]: Set hostname to <vaccel-guest.nubificus.co.uk>.
[    1.422933] systemd-veritys (84) used greatest stack depth: 14088 bytes left
[    1.424285] systemd-cryptse (74) used greatest stack depth: 14024 bytes left
[    1.432533] systemd-sysv-ge (83) used greatest stack depth: 13976 bytes left
[...]
[  OK  ] Started Login Service.
[  OK  ] Started OpenBSD Secure Shell server.
[  OK  ] Finished Remove Stale Onli…ext4 Metadata Check Snapshots.
[  OK  ] Started Dispatcher daemon for systemd-networkd.
[  OK  ] Reached target Multi-User System.
[  OK  ] Reached target Graphical Interface.
         Starting Update UTMP about System Runlevel Changes...
[  OK  ] Finished Update UTMP about System Runlevel Changes.

Ubuntu 20.04.2 LTS vaccel-guest.nubificus.co.uk ttyS0

vaccel-guest login:
In both cases above, as with the previous hypervisors, we log in using the root
user (user: root, no password).
launch a new terminal and go to Running the application
DragonBall
To launch a Dragonball VM, we will use a nifty
tool developed by the OpenAnolis
people, dbs-cli. Essentially, it shares code with rust-vmm's
vmm-template, and it provides a CLI
tool to launch the Dragonball hypervisor and interact with it.
The files we need are:
wget https://s3.nbfc.io/nbfc-assets/github/vaccelrt/vm-example/x86_64/dbs/dbs-cli
wget https://s3.nbfc.io/nbfc-assets/github/vaccelrt/vm-example/x86_64/rust-vmm/vmlinux
We should have the following directory structure:
# tree
.
├── dbs-cli
├── rootfs.img
└── vmlinux

0 directories, 3 files
The command to spawn a Dragonball VM is shown below:
# make the VMM binary executable
chmod +x dbs-cli

# launch the VM
./dbs-cli --kernel-path vmlinux --rootfs rootfs.img \
      --boot-args "console=ttyS0 pci=off root=/dev/vda rw" \
      --vsock /tmp/vaccel.sock
The logs of the VM are similar to the above cases:
[    0.000000] Linux version 6.0.0 (ananos@dell00) (gcc (Ubuntu 9.4.0-1ubuntu1~20.04.1) 9.4.0, GNU ld (GNU Binutils for Ubuntu) 2.34) #14 SMP PREEMPT_DYNAMIC Mon Nov 14 15:52:14 UTC 2022
[    0.000000] Command line: console=ttyS0 tty0 reboot=k debug panic=1 pci=off root=/dev/vda virtio_mmio.device=8K@0xc0000000:5 virtio_mmio.device=8K@0xc0002000:5
[...]
[    1.977652] systemd[1]: Mounting cgroup to /sys/fs/cgroup/cpu,cpuacct of type cgroup with options cpu,cpuacct.
[    1.978731] systemd[1]: Mounting cgroup to /sys/fs/cgroup/pids of type cgroup with options pids.
[    1.979455] systemd[1]: Mounting cgroup to /sys/fs/cgroup/memory of type cgroup with options memory.
[    1.980219] systemd[1]: Mounting cgroup to /sys/fs/cgroup/cpuset of type cgroup with options cpuset.

Welcome to Ubuntu 20.04.2 LTS!

[    2.000846] systemd[1]: Set hostname to <vaccel-guest.nubificus.co.uk>.
[    2.002803] systemd[1]: Successfully added address 127.0.0.1 to loopback interface
[    2.004233] systemd[1]: Successfully added address ::1 to loopback interface
[    2.005430] systemd[1]: Successfully brought loopback interface up
[...]
[  OK  ] Started Login Service.
[  OK  ] Started OpenBSD Secure Shell server.
[  OK  ] Finished Remove Stale Onli…ext4 Metadata Check Snapshots.
[  OK  ] Started Dispatcher daemon for systemd-networkd.
[  OK  ] Reached target Multi-User System.
[  OK  ] Reached target Graphical Interface.
         Starting Update UTMP about System Runlevel Changes...
[  OK  ] Finished Update UTMP about System Runlevel Changes.

Ubuntu 20.04.2 LTS vaccel-guest.nubificus.co.uk ttyS0

vaccel-guest login:
Again, as with the previous hypervisors, we log in using the root user (user:
root, no password).
launch a new terminal and go to Running the application
Running the application
To run the application we first need to provide the backend where the vAccel
API operations will be handled. This is done in the guest via the VSOCK
plugin and in the Host via the vaccelrt-agent. We have setup the guest part
above for each of the hypervisors supported. Let's now move to the agent part.
Running the vAccelRT agent
The vaccelrt-agent is just another vAccel application. It consumes the vAccel
API like any other app, with the additional value of being able to receive
commands via ttrpc. So we need to include the path to libvaccel.so in the
LD_LIBRARY_PATH variable, and specify the plugin we want to use via the
VACCEL_BACKENDS variable. The agent currently supports three socket types:
UNIX, VSOCK, and TCP.
Install vAccelrt agent
If you haven't already installed the vaccelrt-agent binary, follow the instructions in the relevant section.
In short, for x86_64:
wget https://s3.nbfc.io/nbfc-assets/github/vaccelrt/agent/main/x86_64/Release-deb/vaccelrt-agent-0.3.6-Linux.deb
dpkg -i vaccelrt-agent-0.3.6-Linux.deb
To run the agent we need to set the plugin using the VACCEL_BACKENDS variable
and the endpoint. Use the following commands:
export VACCEL_BACKENDS=/usr/local/lib/libvaccel-noop.so
export LD_LIBRARY_PATH=/usr/local/lib:$LD_LIBRARY_PATH
export VACCEL_AGENT_ENDPOINT=vsock://42:2048
./vaccelrt-agent -a $VACCEL_AGENT_ENDPOINT
You should be presented with the following output:
# ./vaccelrt-agent -a $VACCEL_AGENT_ENDPOINT
vaccel ttRPC server started. address: vsock://40:2048
Server is running, press Ctrl + C to exit
You could also enable debug by setting the env variable VACCEL_DEBUG=4.
Note: Depending on which VM case you consider, you might need to edit
$VACCEL_AGENT_ENDPOINT. For example, for the all rust-vmm clones
(Firecracker, Cloud hypervisor, Dragonball, etc.), the VACCEL_AGENT_ENDPOINT
variable corresponds to the vsock socket file specified in the definition of
the vsock device in config.json. In our example this is /tmp/vaccel.sock.
Since the vsock implementation of these VMMs assumes the vsock port as a
postfix to the socket file, the value of the variable is:
VACCEL_AGENT_ENDPOINT=unix:///tmp/vaccel.sock_2048
We have prepared the Host to receive vAccel API operations via VSOCK. Let's
move to the guest console terminal.
Running the application in the guest
In the guest, we will be running a vAccel application; so we need to specify
the path to libvaccel.so and the plugin to be used. In the pre-built rootfs
we have included the VSOCK plugin, at /opt/vaccel/lib/libvaccel-vsock.so.
All the env vars are set, except for the VACCEL_VSOCK parameter, which
speficies the endpoint of the agent. Its default value is vsock://2:2048.
Since we've setup the agent to listen to port 2048, we're good to go.
Note: The Host's default vsock_id is 2, that's why the guest only
needs to set up the port (2048).
The vAccel examples are already in the rootfs image, installed at
/opt/vaccel/bin. So the only thing needed is to execute the example:
# /opt/vaccel/bin/classify /opt/vaccel/share/images/dog_1.jpg 1
Initialized session with id: 1
Image size: 54372B
classification tags: This is a dummy classification tag!
We got the same output as with the native execution case. Well, almost the same; what we missed is the plugin output. See the native execution case below:
$ /opt/vaccel/bin/classify images/example.jpg 1
Initialized session with id: 1
Image size: 79281B
[noop] Calling Image classification for session 1
[noop] Dumping arguments for Image classification:
[noop] len_img: 79281
[noop] will return a dummy result
classification tags: This is a dummy classification tag!
The [noop] lines are not present when running from the VM. This is because
the plugin is executing in the host. We only get the classification tags:
result back. If you look at the other terminal, where the agent is runing, you should see the following:
Created session 1
session:VaccelId { inner: Some(1) } Image classification
[noop] Calling Image classification for session 1
[noop] Dumping arguments for Image classification:
[noop] len_img: 54372
[noop] will return a dummy result
Destroying session VaccelId { inner: Some(1) }
Destroyed session 1
Aha! the plugin output is there (which is expected, since the plugin is running on the Host).