Run a vAccel application remotely
Overview
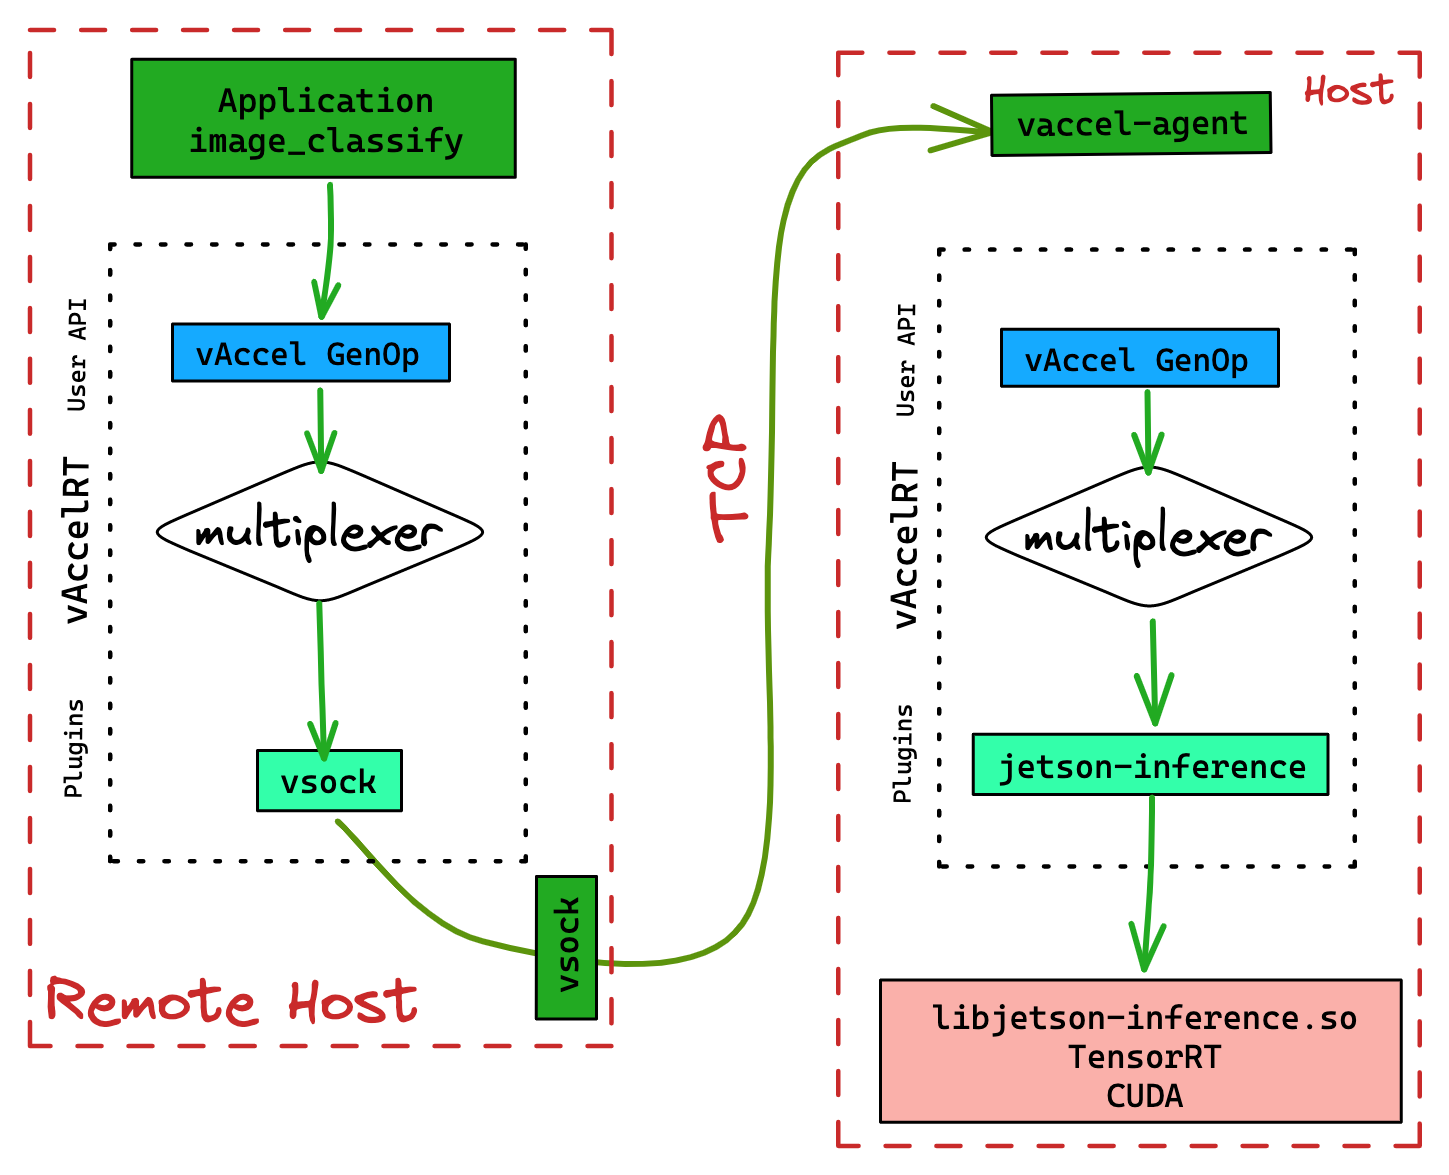
As with the VM case, using the vsock plugin, allows us to run
vAccel applications in remote Hosts. Figure 1 shows the execution flow: Our code
resides in the Remote Host, and uses the libvaccel-vsock.so plugin,
specifying the Host and Port parameters of the vAccel agent, running on the Host
where the hardware accelerator resides; the vAccel agent, intercepts vAccel API
operations, and issues calls to the vAccel library, that, in turn, translates
these calls to the relevant, user-specified plugin.

Section Running the agent describes the process to run the agent.
To proceed with this example, we need to install the vAccel core library in both machines, and:
- the vAccel agent in the Host machine that holds the hardware accelerator,
- the VSOCK plugin in the remote Host machine that we want to run our vAccel application.
Running the vAccel agent
The vaccel-agent is just another vAccel application. It consumes the vAccel
API like any other app, with the additional value of being able to receive
commands via ttrpc. So we need to include the path to libvaccel.so in the
LD_LIBRARY_PATH variable, and specify the plugin we want to use via the
VACCEL_BACKENDS variable. The agent currently supports three socket types:
UNIX, VSOCK, and TCP. In this example, we are using the TCP socket type.
To run the agent we use the following commands:
export VACCEL_BACKENDS=/usr/local/lib/libvaccel-noop.so
export LD_LIBRARY_PATH=/usr/local/lib:$LD_LIBRARY_PATH
export VACCEL_AGENT_ENDPOINT=tcp://0.0.0.0:8194
/usr/local/bin/vaccel-agent -a $VACCEL_AGENT_ENDPOINT
You should be presented with the following output:
# ./vaccel-agent -a $VACCEL_AGENT_ENDPOINT
vaccel ttRPC server started. address: tcp://0.0.0.0:8194
Server is running, press Ctrl + C to exit
We have prepared the Host to receive vAccel API operations via VSOCK. Let's
move to the remote Host console terminal.
Running the application in the remote Host
In the remote Host, we will be running a vAccel application; so we need to
specify the path to libvaccel.so and the plugin to be used. We need to set
the paths to the vAccel core library and the VSOCK plugin. Additionally, we
need to set VACCEL_VSOCK, to point to the remote endpoint.
The vAccel examples are included in the vAccel core library installation at
/usr/local/bin. So, assuming the agent is running in the Host machine, the
only thing needed is to set the paths and execute the example:
### Set the library path and the plugin
$ export LD_LIBRARY_PATH=/usr/local/lib
$ export VACCEL_BACKENDS=/usr/local/lib/libvaccel-vsock.so

### Set the remote endpoint
### no DNS resolving for now, just use IP Addresses
$ export VACCEL_VSOCK=tcp://192.168.254.1:8194

### Get an image:
### eg. wget https://i.imgur.com/aSuOWgU.jpeg -O cat.jpeg
### and run the example
$ /usr/local/bin/classify cat.jpeg 1
Initialized session with id: 1
Image size: 54372B
classification tags: This is a dummy classification tag!
We got the same output as with the native execution case. Well, almost the same; what we missed is the plugin output. See the native execution case below:
The [noop] lines are not present when running from the remote machine. This
is because the plugin is executing in the remote Host. We only get the
classification tags: result back. If you look at the other terminal, where
the agent is running, you should see the following:
Created session 1
session:VaccelId { inner: Some(1) } Image classification
[noop] Calling Image classification for session 1
[noop] Dumping arguments for Image classification:
[noop] len_img: 54372
[noop] will return a dummy result
Destroying session VaccelId { inner: Some(1) }
Destroyed session 1
Aha! the plugin output is there (which is expected, since the plugin is running on the Host).